Welcome to our blog!
Here you will learn how to create a website that is both secure and attractive. We will cover topics such as designing your website, configuring web security, integrating third-party tools, and designing for mobile devices. We will also provide tips for optimizing your website for search engines and managing your online presence.
- Details
- Hits: 2122
Very often, we are contacted by clients who ask us to change their old URL to a new one in their Joomla sites.
In this article I am explaining how you can do just that the best way possible in a few steps.
You may need to do this, for example, if you migrate an existing Joomla site to a new server and the site doesn't display correctly, or because you just want a different domain name for your site.
Whatever the reason may be, the following steps are just what you are looking for.
So it doesn't matter if you are using Hepsia cPanel or cPanel, as long as you are able to locate "File Manager" and "phpMyAdmin".
Below are the steps you will need to follow to accomplish your goals:
Step 1.
Login to your cPanel and then go to the File Manager.
Step 2.
Locate the installation files for your Joomla files for the domain you are about to change. Search for the root folder of your Joomla installation, then open the CONFIGURATION.PHP file with one of the editing options of the File Manager.
Step 3.
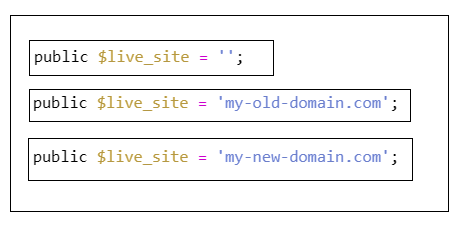
Look for the setting
"public $live_site=' '," and replace the old URL with the new one, just as it's displayed below.

Note:
Only replace URL in your "public $live_site=' '," if the Joomla configuration file has one URL in the setting already.
Otherwise leave it alone and just proceed to edit your "public $log_path" and "public $tmp_path" in configuration file if your Joomla admin "Path to Log Folder" and "Path to Temp Folder" located at Global Configuration under System and Server tabs are different.
Configuration File:

Global Configuration:

Step 4.
Once you have completed the changes, click on SAVE CHANGES in your editor.
Change the Database Settings of Your Joomla Installation.
Step 1.Login to your cPanel.
Step 2.
Scroll down to the DATABASES section and click on phpMyAdmin.
Step 3.
Select your Joomla database and then click on EXPORT in the top menu after the database is selected. The exported format will be SQL (e.g. filename.sql)
Step 4.
Save the resulting SQL file to your local pc/hard drive.
Step 5.
Just to be safe, please make a copy of the SQL file and save it in another folder or location. You may need that database in event of an accident with your first modification.
Step 6.
Open the SQL file in a TEXT EDITOR (e.g. Notepad.). But I personally recommend using Notepad++. Using the regular Notepad may cause misconfiguration to your database settings.
Step 7.
Find and Replace all of your old URLs with the new one.
Note: The default keyboard shortcut for "find and replace" is CTRL+H (hold down your control key and click on 'H') - this will bring up the Find and Replace dialog. But if you are using Notepad++, the "find and replace" icon is already visible on the menu.

Step 8.
Once you have replaced all of the old URLs with your domain name save the SQL file.
Step 9.
Go back to your phpMyAdmin and click on the Structure tab of the database in question, in order to see all of your tables.
Step 10.
Scroll to the bottom of your table list and then click on the box labeled Check all.
Step 11.
Next, click on the drop-down arrow to the right where it says "With selected:".
In the drop-down menu, select Drop under the section labeled Delete Data or table. It will proceed to drop all of the tables. But before that, the system will ask to confirm if you would like to drop the tables or not. Click on Yes to complete the drops.
Please note that we are not deleting the overall database, we are just dropping the tables so we can re-populate it with the updated table that we are about to import on the Step 12.
Step 12.
Once all of the tables are gone, you can then go back to phpMyAdmin and then IMPORT your updated SQL file back into the SAME Joomla database.
Step 13.
Login into your hosting account and rename your old domain name if different from the new one. You may consider contacting your hosting provider to rename it for you if you can't do it yourself.
As always, now that you have completed all the necessary changes and updated everything with your site, we usually recommend checking your website for broken links. Why having broken web links is so bad and why you should fix it? Dead hyperlinks on websites are not just annoying, their existence may cause some real damage to your online business as well as to your reputation in the Internet! Because of that same situation, a web-site owner may: As you can see, broken links can be problematic for website visitors, making them unable to access the desired resource or information. These users may decide to make use of another site to find the necessary information elsewhere. A site that hasn’t been updated or checked for a long time may suffer from link rot, which is a term used to describe a site with dozens of broken links. Suggestion Make sure to check your site regularly using SEO Tools like Broken Links Finder which can be found in search engile like Google or Yahoo. With the Broken Links Finder, you can check your site and correct 404 error pages you may have without realizing that you had one.
Checking your Site for Broken Links


